type
Post
status
Published
date
Jul 2, 2021
slug
git
summary
git使用教程
tags
工具开发小技巧
category
技术分享
icon
password
Author:ShineVersion:9.0.2
[TOC]
一、引言
在单人开发过程中,需要进行版本管理,以利于开发进度的控制。在多人开发过程中,不仅需要版本管理,还需要进行多人协同控制。
二、介绍
Git是一个开源的分布式版本控制系统,用于敏捷高效地处理任何或小或大的项目。Git 是 Linus Torvalds 为了帮助管理 Linux 内核开发而开发的一个开放源码的版本控制软件。官网:https://git-scm.com/
三、Git安装
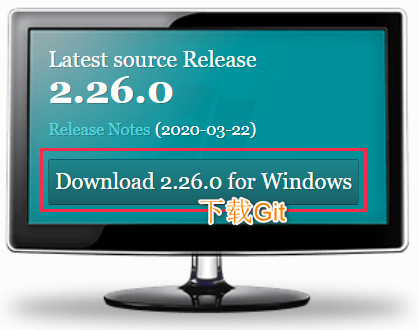
3.1 下载Git
下载Git https://git-scm.com/downloads
下载git
3.2 安装
安装,除了安装位置外,其他一直下一步即可
3.3 基本配置
安装后,打开cmd ,自报家门如下信息会在提交代码时要使用,记录在你的每次提交中。以后才知道哪次提交是谁做的。
3.4 测试
测试:cmd中执行 ,查看git版本
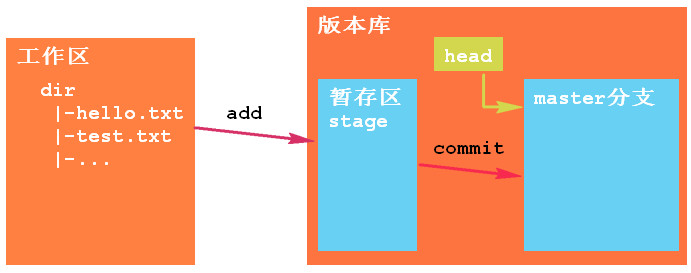
四、架构
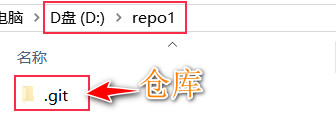
版本库:工作区中有一个隐藏目录 .git,这个目录不属于工作区,而是git的 版本库,是git管理的所有内容暂存区:版本库中包含一个临时区域,保存下一步要提交的文件。分支:版本库中包含若干分支,提交的文件存储在分支中
架构图
五、仓库
对应的就是一个目录,这个目录中的所有文件被git管理起来。以后会将一个项目的根目录,作为仓库。仓库中的每个文件的改动 都由git跟踪。
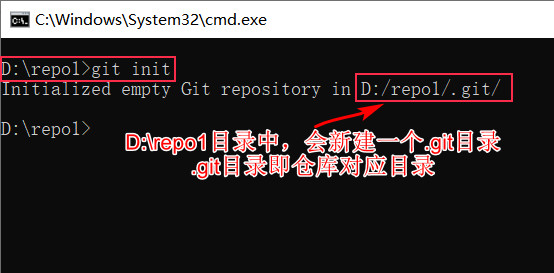
5.1 新建仓库
选择一个目录,执行指令:git init
5.2 工作区
执行git init的目录即为工作区,如上例,D:\repo1目录即为工作区【不包含.git目录】
所有文件,都首先在工作区新建,然后可以存入仓库(版本库),进行版本控制。
5.3 暂存区
暂存区也在 .git 目录内,工作区的文件进入仓库时,要先进入暂存区。
5.4 分支
版本控制,简单说,就是记录文件的诸多版本,分支就是这些版本的最终记录位置。
六、基本操作
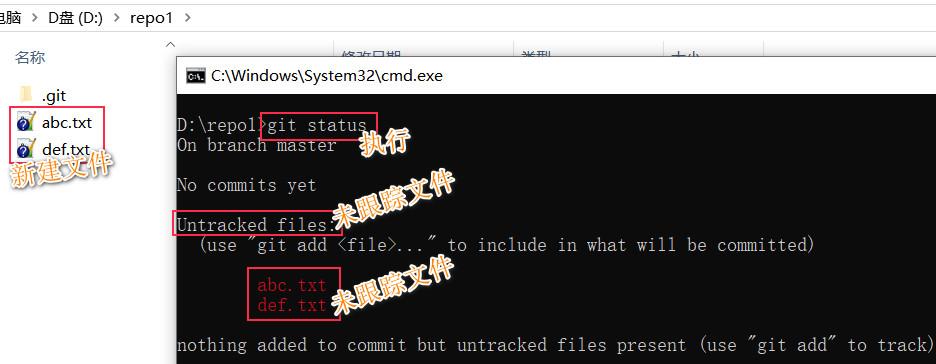
6.1 查看仓库状态
执行 git status 可以看到工作区中文件的状态
未记录过的文件,是未跟踪状态
6.2 暂存文件
执行 git add . 将工作区中的文件全部存入暂存区
将工作区中的文件存入暂存区

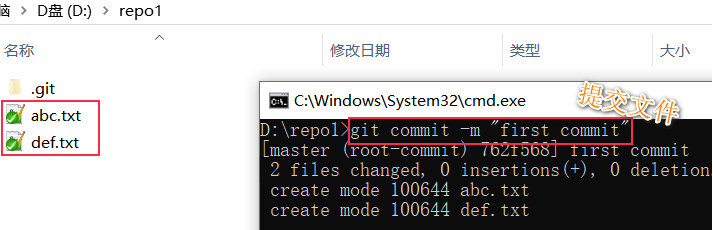
6.3 提交文件
执行 git commit -m "这里写提交的描述信息" 作用是将暂存区的文件存入分支,形成一个版本
提交文件,形成一个版本
七、远程仓库
第5章中的仓库,其实是本地仓库。当多人协同开发时,每人都在自己的本地仓库维护版本。但很重要的一点是,多人之间需要共享代码、合并代码,此时就需要一个远程仓库。
7.1 远程仓库工作模式
远程仓库工作模式

7.2 远程仓库选型
有很多远程仓库可以选择,比如 github(https://github.com/),码云(https://gitee.com/);此两种可以注册自己测试使用,但如果是商业项目,需要更多支持需要付费。公司内部也可以有自己构建的远程仓库(http://qianfeng.qfjava.cn:8087/users/sign_in)。
7.3 基本操作
每个开发人员,在面对远程仓库时,会面临的一些基本操作。
7.3.1 注册git服务器账号
在 码云 注册账号,并登录。进入公司后,很可能会使用公司自己搭建的git服务器,则账号向领导索要即可

登录后显示主页

7.3.2 新建远程仓库
创建远程私有仓库-01

创建远程私有仓库-02

创建远程私有仓库-03

7.3.3 本地关联远程仓库
本文档中选用仓库的 https协议的地址,将此地址关联到本地git中
如此后,本地即可用“origin” 代指远程仓库

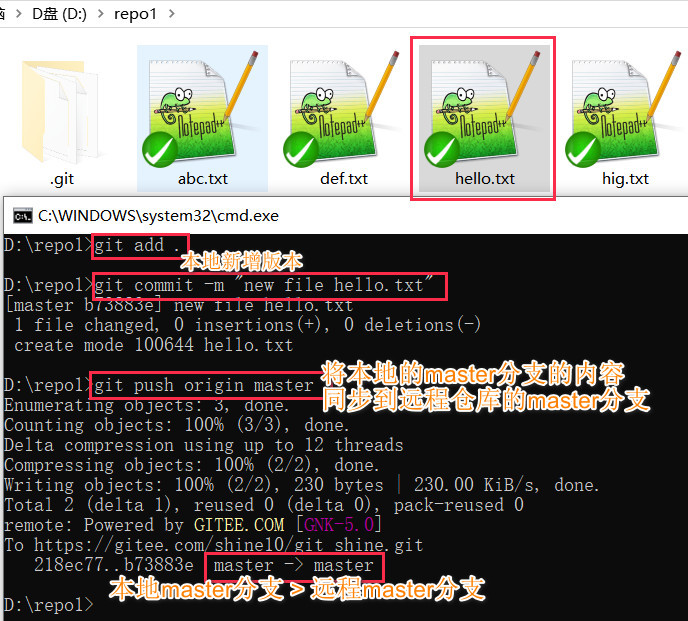
7.3.4 推送文件到远程仓库
将本地仓库中已经commit的内容push到远程仓库,以共享自己的代码。
push

输入凭证,如此码云才能接受此次上传的内容

7.3.5 克隆远程仓库
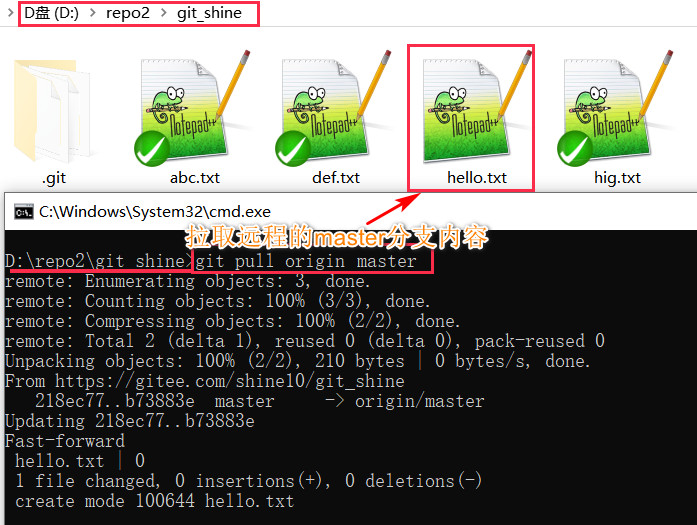
如果仓库已经由别人创建完毕,我们需要其中的内容,则可以通过 git clone 将其复制到本地。
新建目录“repo2”,然后在其中执行 git clone

远程仓库,复制到本地,并自动初始化为一个本地仓库

7.3.6 代码共享
多人协同开发时,写好代码的git push 上传到远程仓库;需要代码的 git pull 拉取代码即可。
有人再次将本地仓库内容,上传到了远程仓库
重点:此时另一方如果想获得更新,则需要做一次拉取 git pull
7.3.7 命令汇总
命令 | 描述 |
git remote add 标识名(master) 远程地址 | 本地关联远程仓库 |
git push 标识名 master | 将本地仓库内容上传到远程仓库 |
git pull 标识名 master | 从远程仓库下载内容到本地仓库 |
git clone 远程地址 | 将远程仓库复制到本地,并自动形成一个本地仓库 |
八、分支
8.1 分支简介
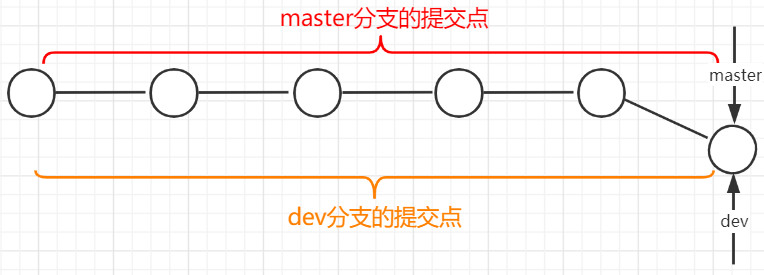
分支,是一个个版本最终存储的位置。分支,就是一条时间线,每次git commit形成一个个版本,一个个版本依次存储在分支的一个个提交点上。
分支由多个提交点组成,分支上会有一个指针,默认总是指向最新的提交点

8.2 分支操作
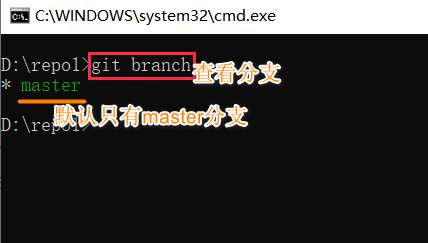
8.2.1 查看分支
查看当前仓库的分支 git branch仓库中默认只有 master 分支执行git commit时,默认是在master分支上保存版本。
默认只有master分支
8.2.2 创建分支
在商业项目开发过程中,我们不会轻易的在master分支上做操作。我们会新建一个开发用的分支,在此分支上做版本的记录。当代码确实没有问题时,才会将开发分支上成熟的代码版本添加到master分支上。保证开发过程中,可以及时记录版本,又保证master分支上每个提交点都是稳健版本。
创建分支

8.2.3 切换分支
默认情况下,当前使用的分支是 master分支可以切换到 dev分支,则后续的git commit 便会在dev分支上新建版本(提交点)
切换分支

再次查看分支情况

8.3 新建分支细节
新建分支时,新分支,默认有哪些内容?分支中包含了哪些次提交?
8.3.1 新分支初始内容
每个分支都有一个指针,新建一个分支,首先是新建一个指针。而且新分支的指针会和当前分支指向同一个提交点。新分支包含的提交点就是从第一个提交点到分支指针指向的提交点。
每个分支都有一个指针,新建一个分支,首先是新建一个指针

8.3.2 多分支走向
在master分支和新分支,分别进行 git add 和 git commit分支情况如下图:
master分支未动,在dev分支增加一次commit

master分支增加一个commit,dev分支再增加一个commit

8.3.3 分支提交日志
查看分支的提交日志,进而看到分支中提交点的详细情况。
提交情况如下

查看当前分支的提交日志

8.4 分支合并
两个分支内容的合并
git merge 分支a 合并分支a
合并的方式有两种:快速合并 和 三方合并。
8.4.1 快速合并
如果分支A当前的修改,是完全基于分支B的修改而来,则B分支合并A分支,就是移动指针即可。
合并前分支状态

快速合并效果(master 合并 dev)
8.4.2 三方合并
在不具备快速合并的条件下,会采用三方合并。
合并前,分支状态

三方合并,将和的更改都累加在上,形成新的提交点

8.4.3 合并冲突
两个分支进行合并,但它们含有对同一个文件的修改,则在合并时出现冲突,git无法决断该保留改文件哪个分支的修改。
8.4.3.1 冲突演示
场景模拟如下:
master分支修改hig.txt文件
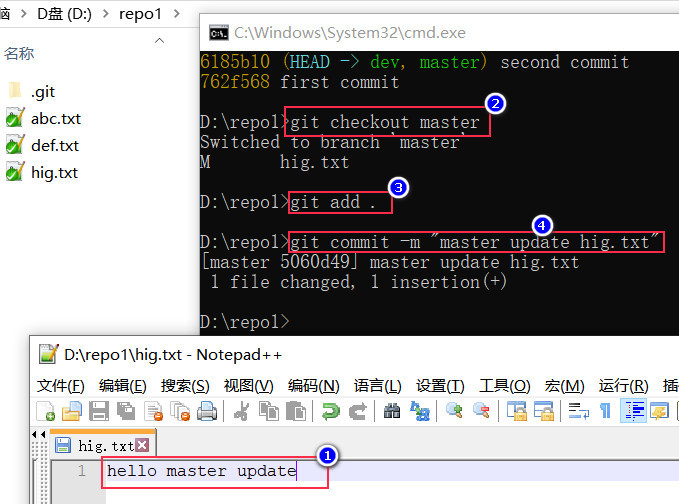
dev分支修改hig.txt
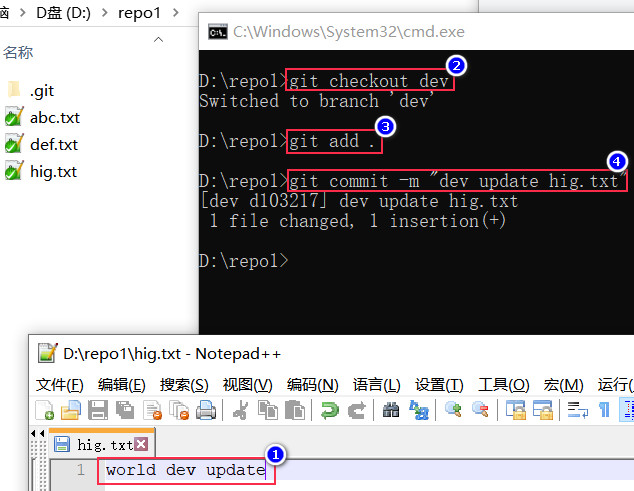
在master分支 合并 dev分支
合并dev分支
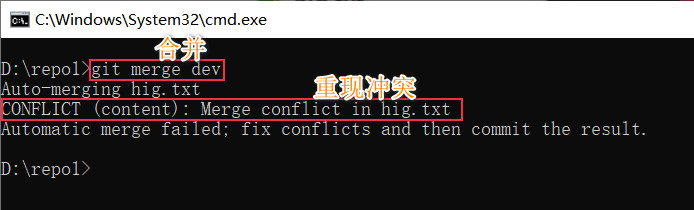
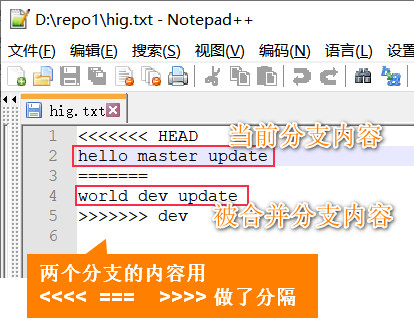
此时,打开hig.txt 文件:
冲突后,git会将两个分支的内容都展示在文件中
8.4.3.2 冲突解决
出现冲突后,如要由两个开发人员当面协商,该如何取舍,为冲突文件定义最终内容。解决方案:
- 保留某一方的,删除另一方的
- 保留双方的
- 但无论如何,要记得删除 <<<< ==== >>>> 这些
- 本质是两人协商为冲突的内容,定制出合理的内容。
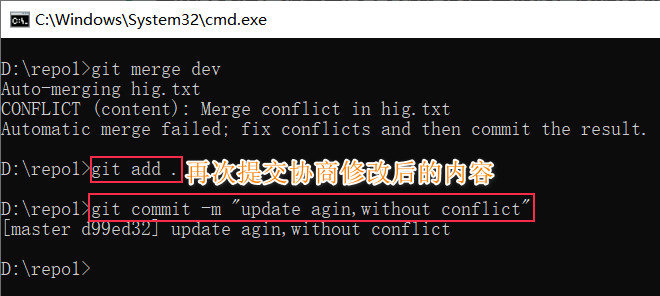
根据协商,再次编辑文件

提交 再次编辑后的文件
九、Idea关联Git
9.1 关联Git
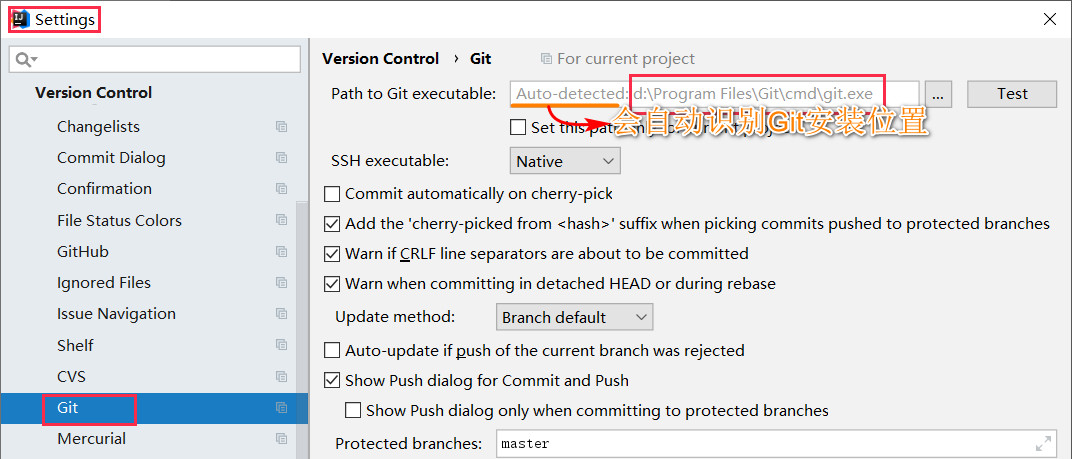
File > Settings 关联过程是自动的
此处关联是Idea可以自动完成的
9.2 创建仓库
新建项目后,将项目目录创建为git仓库注意: 要在建仓库前,设置忽略文件 ".gitignore"作用:被忽略的文件会被版本记录忽略,版本中不包含它们。范围:不需要和其他开发共享的文件,具体见下图。
创建仓库前,先添加忽略文件

将项目目录初始化为一个仓库


9.3 提交-commit
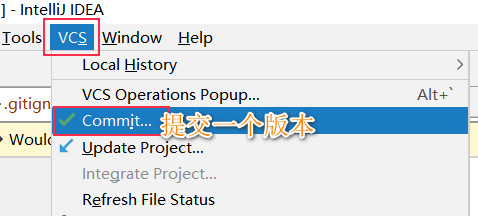
创建好仓库后,做第一次提交。
选择提交菜单
选择提交文件,定义提交信息
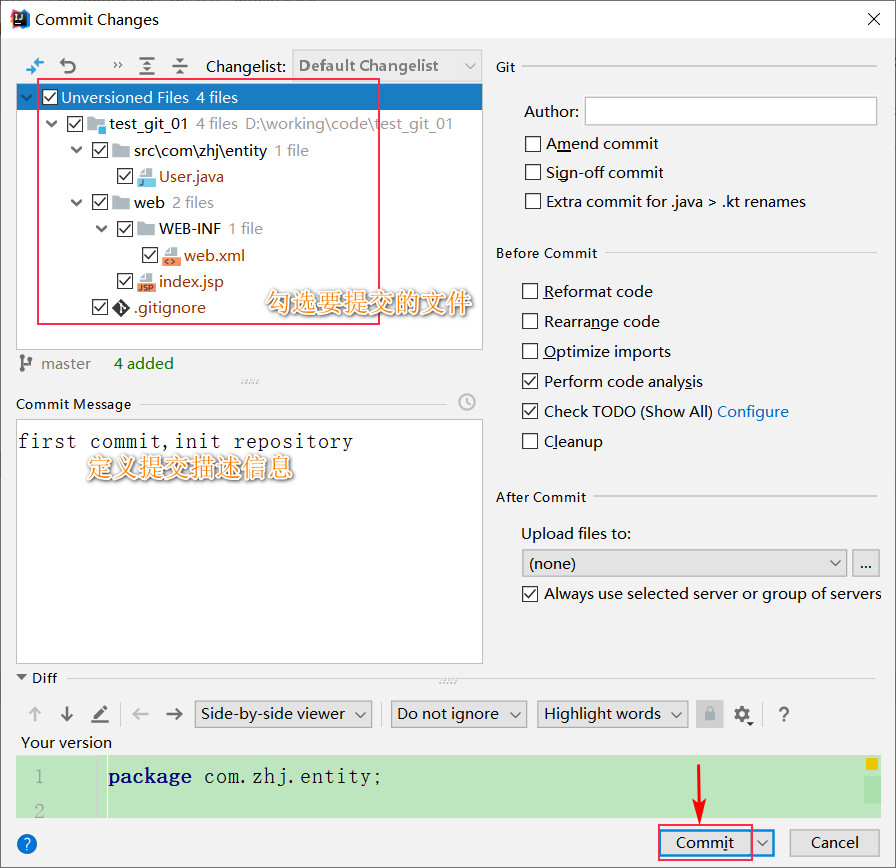
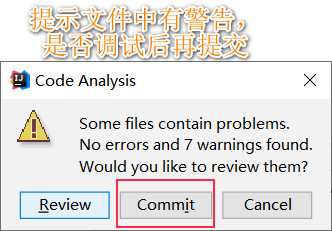
之后会有些友好提示,可以忽略,点击即可
9.4 创建分支
新建开发分支
点击右下角链接,即可

新建分支

查看当前分支

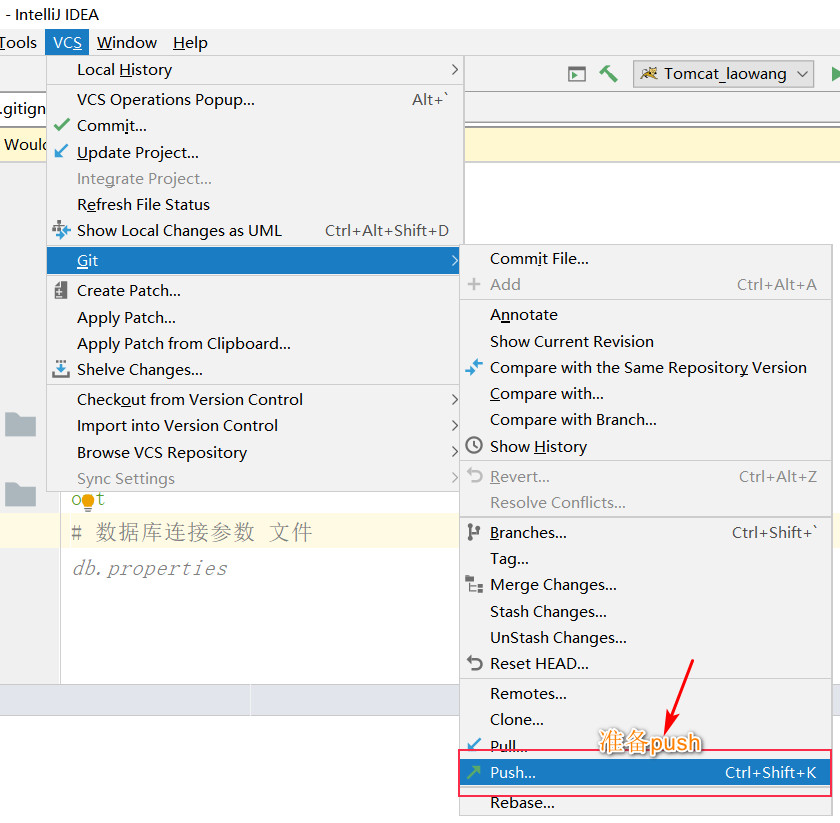
9.5 上传到远程仓库(push)
请首先参照第7章,创建一个远程仓库。要求是裸库,且建议库名和项目名同名。
选择菜单
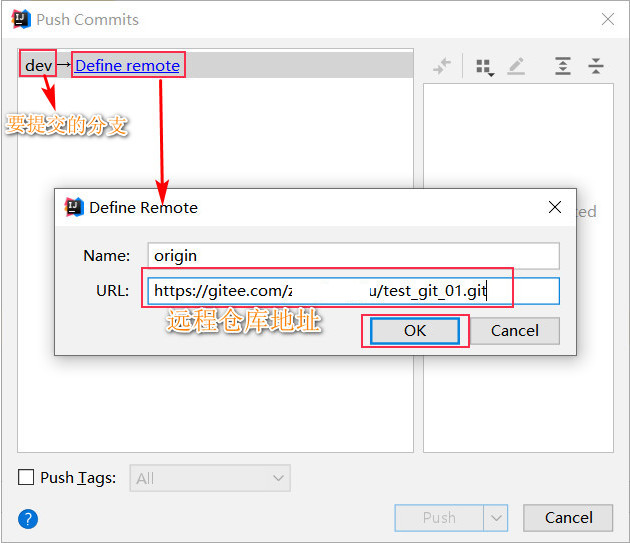
定义远程仓库地址
执行,push操作

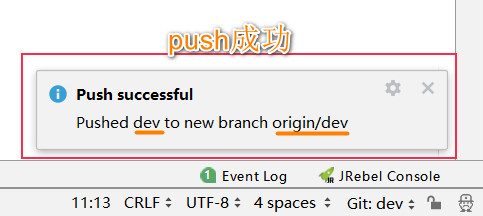
push成功后 ,弹窗提示
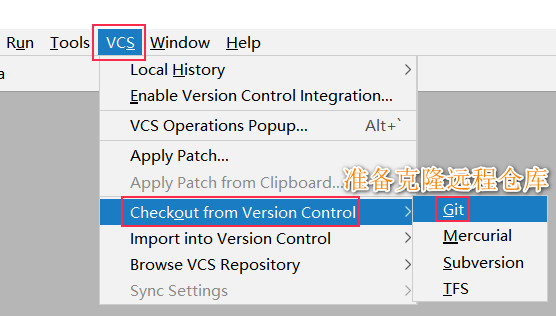
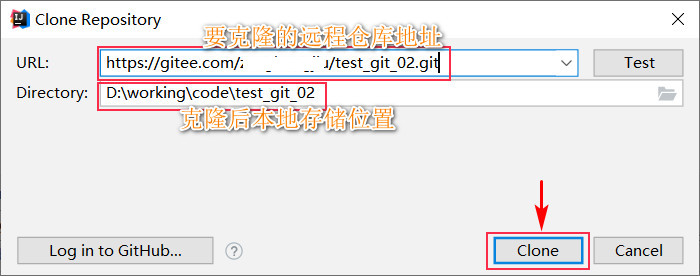
9.6 复制到本地仓库(clone)
如果有建好的远程仓库,比如公司内已经在用的仓库,或者github,码云上的一些公开仓库,可以将远程仓库的项目复制到本地使用。
点击克隆菜单
输入如远程仓库地址
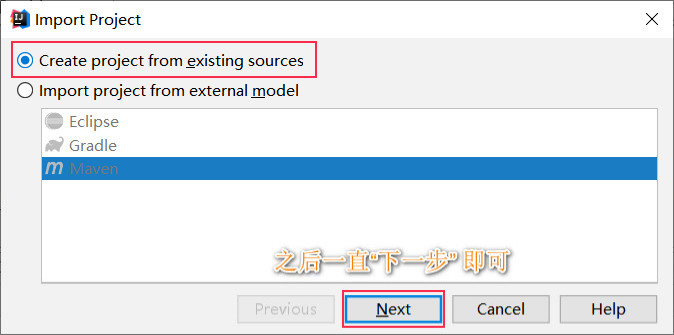
打开项目

打开项目,选项
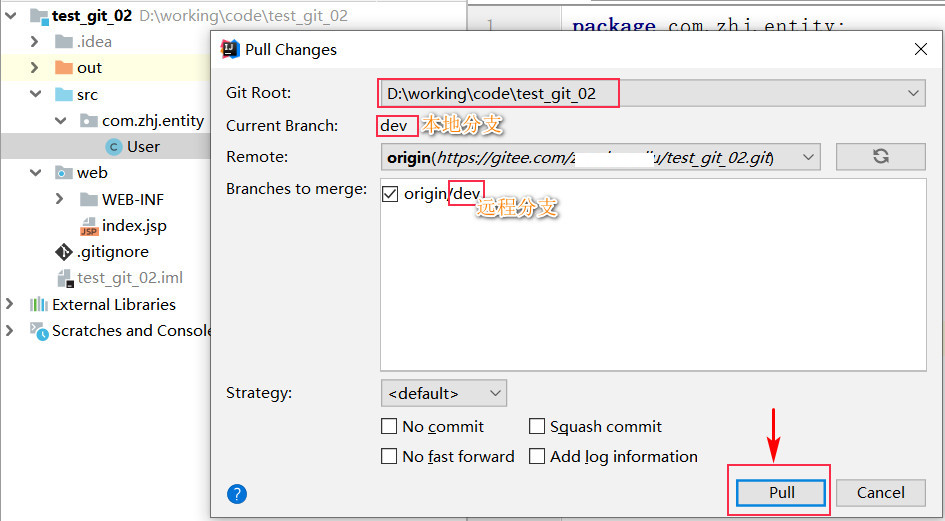
9.7 更新本地项目
如果远程仓库有更新,则你的本地项目也需要一起更新。
选择pull菜单
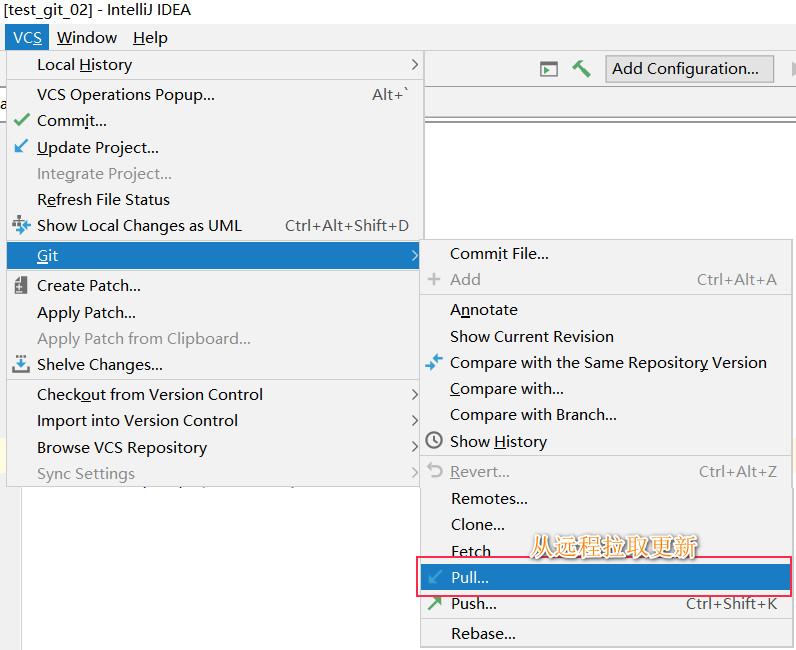
执行 pull操作
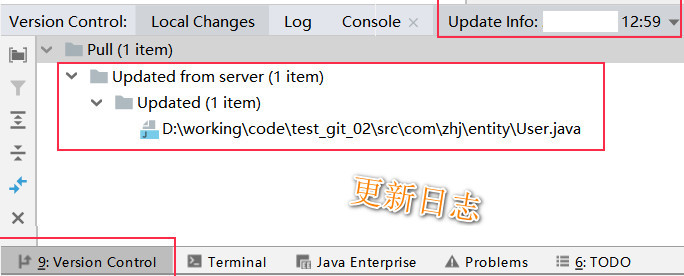
更新日志显示
9.8 冲突解决
合并分支时,如果出现冲突,则需要解决冲突。
冲突出现,弹窗中可以选择如下
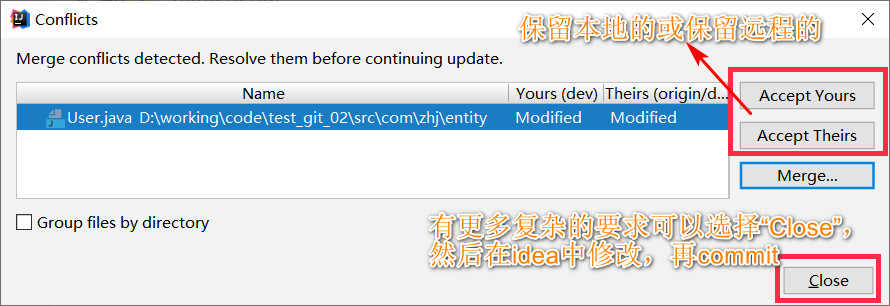
也可以直接修改冲突文件,然后commit即可

十、多人协同开发
多人开发协同,git操作
10.1 项目管理员( 项目经理 )
1> 由管理员负责创建一个远程库,初始的库中什么也没有,为裸库。库的名称建议和项目同名
2> 管理员会在idea中创建一个初始项目,其中包含.gitignore文件。 并在项目根目录下 建立本地库。并建立 dev分支。
3> 管理员将本地库上传到远程库
4> 将其他开发人员拉入远程库的 开发成员列表中 ,使得其他开发人员可以访问该远程库。流程如下:
点击添加成员

选择直接添加

提交

查看已添加的开发成员

5> master分支设置为 protected分支,只有管理员有权限将代码合并到其中。dev分支设置为 常规分支所有开发人员 都可以其中合并代码
进入分支设置

设置保护分支,让master分支不能被随更改

10.2 开发人员
初始化:在idea中clone 远程库,获得项目。会建立本地库后续的开发中,都要在dev分支上进行。开发完一个功能并测试通过后就commit 提交到本地的dev分支中,然后 上传(push)到远程dev分支中。需要更新项目内容时,通过 pull 从远程仓库拉取内容。注意:多人协同时,每次在 push 到远程库前,都先做一次pull,一来是把远程最新内容合并到本地,二来是核实本地内容是否和远程内容有冲突。后续的开发,会接到一个个的功能任务,往复操作 2>、3>、4> 而已。
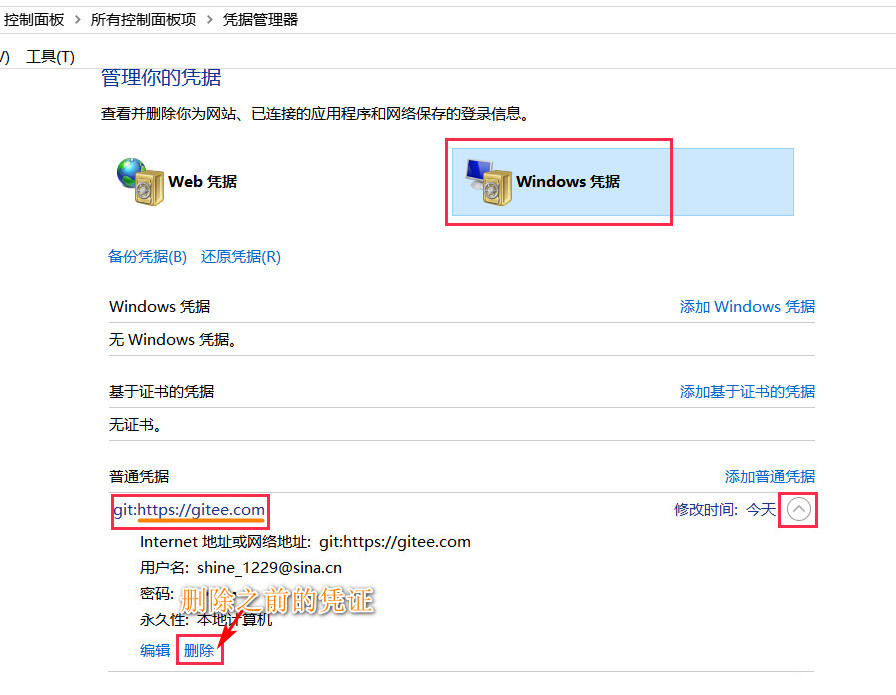
十一、经典问题
在使用https协议做push时,如果曾经使用过码云,但密码有过改动,此时会报错
使用https协议报错

解决方案: 控制面板 》 凭据管理器 》 删除对应凭证,再次使用时会提示重新输入密码。
删除之前的码云凭证,然后重新push即可